Cluster
Acknowledgement
If your work is or has been supported by the use of this cluster or the Lamarr infrastructure in general, it is required that you include an acknowledgement in any publication to allow continued use by you and others. We recommend the following approach:
This research has been funded/supported by the Federal Ministry of Research, Technology and Space of Germany and the state of North Rhine-Westphalia as part of the Lamarr Institute for Machine Learning and Artificial Intelligence.
This documentation describes how to use the Slurm-managed computer cluster of the Lamarr Institute.
- Acknowledgement
- Quick start
- Basic topics
- Advanced topics
- Expert topics
Quick start
This is a condensed introduction of how to use our cluster. More detailed information is provided in the later sections.
Overview
Our cluster allows us to perform compute-heavy research that needs large amounts of data or large amounts of processing power. To this end, it provides multiple nodes with many CPU cores, powerful GPUs and lots of main memory, as well as large storage capabilities. Users can access this compute power by starting Slurm jobs, a form of light-weight virtual machines, with the desired hardware resources and software installation.

The cluster is hidden behind 3 gateway servers (most importantly, the default gwkilab server). Using SSH, users can connect to their jobs via a gateway machine and run their experiments. Jobs have a maximum wall-time; after this time, they will be terminated automatically. Results can be persisted in the network file system cephfs, which is shared across all nodes in the cluster and mounted under /home per default. Additionally, Each node has a fast local storage, mounted under /raid per default.
Getting access to the cluster
How can you get access to the cluster?
- You are required to have an official Lamarr account including access to the mattermost. Contact your supervisor to create the account for you.
- Write Dominik Baack via Mattermost, to create a cluster account. Ideally by using this template:
Name:
E-Mail:
Type of Work:
Affiliation: Fraunhofer, Dortmund, Bonn, ...
Chair:
Supervisor:
Approximate access duration:
Telephone (optional):
Please remember to add a SSH KeyFile
- Wait until you receive your login information, this should usually not exceed 7 days.
Slurm: Basic vocabulary
Slurm is a workload manager, which, in our case, manages the execution of Docker containers. As such, Slurm is the main interface between you and our cluster.
A Slurm job resembles a computer that you can access remotely via SSH to perform computations, to load and save files, and so on. However, a job is only virtual and it will be removed after some time. Therefore, in order to preserve the results of your work, you will need to save them to specific locations in our network file system.
Each Slurm job is based on a Docker container, an isolated environment in terms of the software that is installed. You can think of a container as an Anaconda or a venv environment - covering, however, not only a set of Python packages but a complete operating system. When a Slurm job terminates, you can start another job that is based on the same container: the new job will have the same software and configuration, as if you had rebooted an actual computer.
You will also encounter the concept of Docker images. An image is a blueprint for a container, i.e., it defines which software is initially installed and how the container is initially configured. When creating a container, you will have to decide which image to use.
Managing Slurm jobs
This section describes how to create and maintain Slurm jobs and their Docker containers.
Creating a Slurm job
-
Use SSH to log in to gwkilab, the main gateway server in our cluster.
ssh <username>@gwkilab.cs.tu-dortmund.de -
Start a tmux session. This session is needed later, to let your container run in the background.
tmux new -s <name>It is useful to choose a short and descriptive name for your session.
-
Create a new Slurm job.
srun --mem=64GB   \ # specify the amount of RAM
     --export ALL \
      -c 8        \ # specity the number of cores
     --container-name=<name> \ # container name (e.g., use the same as for your tmux session)
      -p CPU      \ # container queue (CPU, GPU1, GPU2, GPU4, GPU8)
     --container-image=nvcr.io/ml2r/interactive_ubuntu:22.04 \ # container image name
     --mail-user=email@adress.xx \ # Please use your email adress!
     --mail-type=ALL \
     --pty /bin/bash
or as GPU Job
srun --mem=64GB   \ # specify the amount of RAM
     --export ALL \
      -c 8        \ # specity the number of cores
     --gres=gpu:1 \
     --container-name=<name> \ # container name (e.g., use the same as for your tmux session)
     --job-name="SomeName" \  # arbitary jobname to make it easier for you to identify in squeue
     -p GPU1      \ # container queue (CPU, GPU1, GPU2, GPU4, GPU8)
     --container-image=nvcr.io/ml2r/interactive_cuda \ # container image name
     --mail-user=email@adress.xx \ # Please use your email adress!
     --mail-type=ALL \
     --pty /bin/bash
(Instead of breaking lines with
\you can write everything in a single line). As you can see, starting a job requires you to choose a Docker image.--ptymust be placed as the last command end defines which shell or task should be started as default. -
Do stuff!
-
Learn how to detach and re-attach to your job (or simply exit when you're done).
By the way, the above command has not only created a Slurm job, but also a Docker container, which defines the environment of the job. When your job terminates, you will be able to recover your container from the --container-name that you have assigned.
Partition and Hardware specification
The partition specified with the parameter -p GPU1 etc. ensures that the job is given a place in the correct queue. The queue name represents the maximum number of GPUs to be allocated. At present there is no restriction on requesting more GPUs than the queue provides, but the job can then be stopped at any time without warning by the automatically running script.
The actual number of GPUs the job receives is specified by the parameter --gres. There are currently 3 configurations possible here:
--gres=gpu:1
--gres=gpu:nvidia_a100-sxm4-40gb:1
--gres=gpu:nvidia_a100-sxm4-80gb:1
The first method assigns the next possible graphics processor, methods 2 and 3 specify exactly which graphics processor the job should use. In this case, it is the 40GB or 80GB variant of the A100. If it is not necessary, the automatic variant is always preferable.
The last parameter, here ":1" specifies the actual number of GPUs assigned. This must be <= the number in the queue.
GPU1 -> 1 GPU2 -> 1,2 GPU4 -> 1,2,3,4 GPU8 -> 1,2,3,4,5,6,7,8
The available accelerator can be checked via: sinfo -o %G
Usually the list above should be kept up to date.
Available Docker images
The --container-image argument has the following form:
nvcr.io/ml2r/interactive_<base name>:<version>The following choices for <base name> and <version> are available:
| base name | versions |
|---|---|
pytorch |
22.05-py3, 22.12-py3, 23.01-py3, 23.07-py3, 23.09-py3, 23.12-py3
|
tensorflow |
22.05-tf2-py3, 22.12-tf2-py3, 23.01-tf2-py3, 23.07-tf2-py3, 23.09-tf2-py3
|
ubuntu |
18.04, 20.04, 22.04, 23.04
|
cuda |
12.2.0 |
cuda + OpenGL |
11.4.2-ubuntu20.04 |
For example, if you want an Ubuntu 22.04, you need to specify nvcr.io/ml2r/interactive_ubuntu:22.04.
When not specifying a version the latest will be used.
Starting from any of the above images, you can later install additional Python packages or system packages. You can also create custom images, which is, however, a more involved process than simply starting from an available image.
The build process of all available Docker images is published in the custom-container-example repository.
If you need images from other repositories, you can use the following syntax docker://REPOSITORY#Image:TAG, for example:
--container-image="docker://ghcr.io#ghcr.io/huggingface/text-generation-inference:latest"Detaching and re-attaching to your job
If you want to leave your job running in the background, you cannot simply close the terminal; if you did, the container would be terminated and you might lose your progress. For this reason, we have already created our job inside a tmux session, which we can now simply detach from:
- Inside your tmux session, press
Ctrl+band thendto detach. Now you are back on gwkilab. - To re-attach your session, run
tmux attach -t <name>, where<name>is the name of your session. Now you should be back in your container.
Tip
If you have only a single session, it suffices to run tmux a to re-attach.
In case of failure of the gateway server it is possible to recover you interactive slurm session on one of the backup gateways (e.g. gwkilab1).
Prerequisite:
- Started interactive job on gwkilab in a tmux or screen session
- Crashed Gateway Server
What you can do:
- Login to backup server
- Check your jobid with squeue -u $USER and if its still running for e.g. 12345
- Open an new tmux/screen session (attaching will not work!)
- In the screen session use sattach (you need to fill in the jobid) "sattach 12345.0"
- Profit
sattach requires the subid of your slurmstep, this is appended after the id via a dot (e.g. "ID.SUBID") . If you do not know what jobsteps are used for you should simply try the default ".0" If you are using jobids in you deployment, you should know which id to use.
Stopping a job
If your work is done, please stop your job manually. To do so, re-attach to your job (if not already atteched) and simply exit the terminal session, either by running exit or by pressing Ctrl+d. Your tmux session should be terminated automatically.
Alternatively, the Slurm command scancel ${JOBID} can be used to cancel a job even if a job is not attachable or accessible over the gateway.
Starting a job from an existing container
If you recently started and stopped a Slurm job, you can recover its container by starting a new job with the same --container-name but without the --container-image argument. This procedure resembles rebooting an actual computer: all software and configuration of your container will be present in your new job, too.
What is even better than a reboot is that you can also re-configure the resources of your job. A restart of the above example job would look like this (recognize the missing --container-image argument):
srun --mem=32GB   \ # specify the amount of RAM (might be different than before)
     --export ALL \
      -c 4        \ # specity the number of cores  (might be different than before)
     --container-name=<name> \ # container name
      -p CPU      \ # container queue (CPU, GPU1, GPU2, GPU4, GPU8)
     --pty /bin/bash
You can find all your cached containers in /cephfs/containers/user-$( id -u ). Make sure to clean-up here very once-in-a-while - just delete the folders with rm -rf {CONTAINER-NAME}.
Rules and limits
The following table gives an overview of the resource limits in each Slurm queue (the one you select with the -p argument in your srun command). If no -p argument is given the default GPU1 queue is chosen.
| queue | CPUs (default) | memory (default) | wall-time (default) |
|---|---|---|---|
CPU |
32 | 128984 MB | 7 days (max 21 days) |
GPU1 |
32 | 128984 MB | 7 days (max 14 days) |
GPU2 |
64 | 257968 MB | 3 days (max 7 days) |
GPU4 |
128 | 515936 MB | 3 days (max 3 days) |
GPU8 |
256 | 1031870 MB | 1 days (max 2 days) |
Hardware quota
To provide all users with a fair share of the cluster, some limits and constraints must be enforced. This includes foremost a runtime limit depending on the number of GPUs required. In addition, limits on memory (RAM) and the number of CPU cores are automatically set to reasonable default values. It is possible to overwrite this value with the -c flag in srun. The same can be done with required memory.
Keep the available hardware of a single node in mind, e.g., if you request 1 TB of RAM, no other job will be able to run on the same machine.
Queue and wall-time
If more jobs are scheduled then the cluster can provide, jobs will be put in a queue where they will wait until the requested resources become available. The queue separates between CPU-only jobs and jobs with varying numbers of GPUs; it enforces the constraints in the table above. As of now, the number of requested GPUs and the queue that the job is paced in are separate parameters in the SLURM Command. If booth values do not match, in special #GPUs > queue than the Job can be killed anytime by automatic scripts without any further notification!
Fair share and accounting
To enable fair use, all requested resources are logged. This is independent of the real consumption! Users with high resource consumption will get a lower priority overall compared to new users. Multi-GPU jobs command a higher "price" than the same number of single GPU Jobs, e.g. 8x1 GPU will reduce your share by a smaller amount than 1x8GPUs if utilized for the same time.
Best practices
The Slurm scheduling system allows you to set a specific name for your container, via --container-name=xxx. This name takes priority over --container-image. This leads to the problem that existing containers are loaded regardless of which image is defined; this happens without a warning. Therefore, name your container uniquely to avoid errors.
Monitoring
Check the cluster status
When you are on gwkilab, you can run multiple commands to get status information about the cluster and your containers.
Cluster status
To view information about the cluster status, run sinfo:
user@gwkilab:~$ sinfo
PARTITION AVAIL  TIMELIMIT  NODES  STATE NODELIST
CPU          up 14-00:00:0      7   unk* ml2ran[01,03-08]
CPU          up 14-00:00:0      1   drng ml2ran09
CPU          up 14-00:00:0      1    mix ml2ran10
CPU          up 14-00:00:0      3   idle ml2ran[02,11-12]
GPU1*        up 14-00:00:0      1   drng ml2ran09
GPU1*        up 14-00:00:0      1    mix ml2ran10
GPU2         up 7-00:00:00      1    mix ml2ran10
GPU2         up 7-00:00:00      3   idle ml2ran[02,11-12]
GPU4         up 3-00:00:00      3   idle ml2ran[02,11-12]
GPU8       down 2-00:00:00      2   idle ml2ran[02,12]
The STATE field provides information about the current status of this queue and the corresponding nodes.
In this case the CPU queue is available on several machines and has different states depending on the node.
For some of the states it is possible to check for reasons via sinfo --long --list-reasons
STATE |
FULL | Meaning |
|---|---|---|
* |
Unreachable | State is old and server can currently not be reached |
unk |
Unknown | Queue status is unknown on nodes |
idle |
idle | Nodes are currently empty and waits for jobs |
mix |
Mixed Usage | There are currently runs Jobs on this node and queue but has still space left |
full |
full | Queue and node is full and can't process further jobs |
drng |
Draining | No new Jobs can be scheduled on this Queue+Node. Check the reason for details |
down |
Down | Queue is not available on this node. Check reason for details |
Job status
To view info about your own jobs, run squeue -u $USER.
For more detailed information scontrol show job ${ID} can be used.
Finished job metrics
sacct is a powerful tool for querying all information logged by Slurm. For now, not all information are populated; for example, energy consumption is still work in progress.
sacct --format="CPUTime,MaxRSS"
Visual live metrics
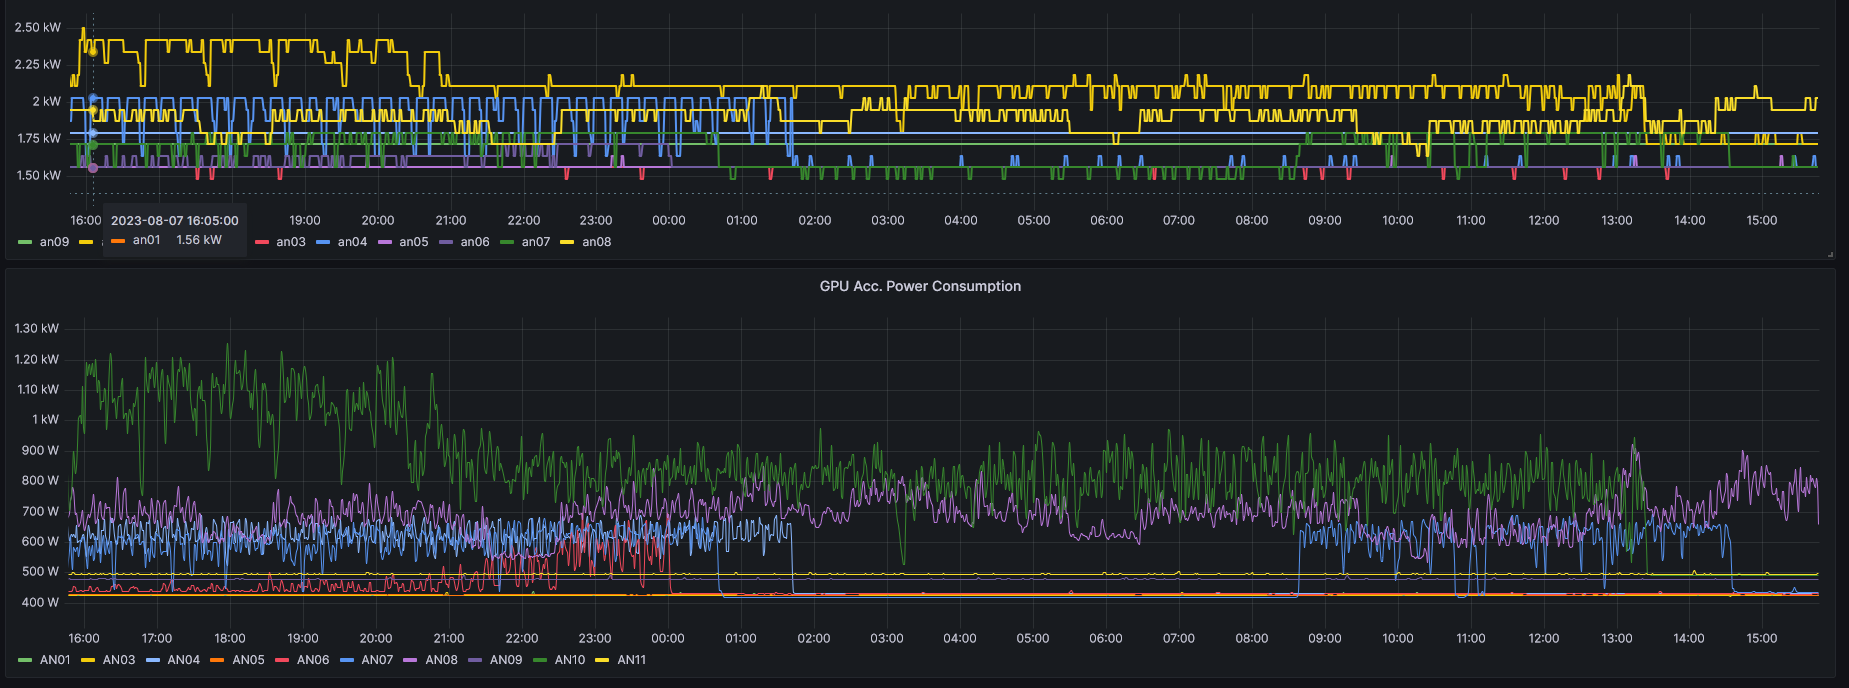
Monitoring with visual output can be done via the Grafana website running on the cluster. For privacy reasons the website is not available outside the cluster network and therefore requires a dedicated port tunnel or a corresponding proxy setup.
Currently, Grafana is reachable via ml2rsn06s0:3000/ and no public website is available. This will change soon.
Installing Python packages
Installation of Python packages works like usual over pip and in images where conda is installed with conda.
Cleanup
Data on /raid will be removed if no process is found on the machine. The time frame where the check will occur is flexible.
Basic topics
This section provides basic background information on the topics discussed above.
Storage
Our cluster supports two main kinds of working storage described below. All storage is not usable for long term storage. If the account is deactivated data will be removed after a short time due to privacy concerns. For good scientific practice data should be kept for 10 years, therefore you need to copy your data to a archive at the end of your thesis!
Global, persistent storage (/home/{user}): This storage option is shared across all containers. Being made persistent and secure by the Ceph file system across multiple storage nodes, it is, however, presumably slower than the
Local, non-persistent storage (/raid/{user}): The local SSD memory of every A100 node is the fastest way to store data. However, upon container termination or node failure, data is likely lost or inaccessible. Stored data is not directly purged after every job, but will eventually be removed after longer inactivity.
Best practices
- Use persistent storage (e.g.,
/home/{user}) for any important data: code, configurations, experimental results - Use non-persistent storage (e.g.,
/raid/{user}) for temporary files and fast access: model snapshots, downloaded data sets- It is recommended to copy your datasets to
/raid/{user}when required for training and clean up after your job has finished
- It is recommended to copy your datasets to
- You can start by dumping all results to local storage, and then periodically copy them to global storage
- If you want to run compute-intensive experiments, it might make sense to explicitly install Python packages to the local SSD
- You can specify which node you want to use when starting containers - this allows to re-access the local storage!
- While both storage types have high limits, please clean up after yourself, and do not store extremely big files persistently, i.e., on
/home/{user}or inside your container workspace
Note
See Advanced storage topics for more information on the file systems.
SSH
For easy access with SSH, it is recommended that you add the address of your Slurm job to the ~/.ssh/config file of your local computer. The folder .ssh is found in your users home folder.
Example entry for accessing a job that run on the node ml2ran10s0 with port 26000:
Host gwkilab
	HostName gwkilab.cs.tu-dortmund.de
	User <username>

Host slurmjob
	HostName ml2ran10s0
	ProxyJump gwkilab
	Port 26000
        User <username>
For <username>, you need to enter your LS8 account user name.
With the above configuration, you can type ssh slurmjob to open a terminal in your Slurm job. This configuration is also the basis for several common use cases for development. If problems arise check if ~/.ssh/authorized_keys inside the job has a key available. If not you must generate a new key file on gwkilab with the following commands and copy it into the job.
# ON **GWKILAB**

cd ~/.ssh/
ssh-keygen  # Press Enter 5 time

echo "IdentityFile ~/.ssh/id_rsa" >> ~/.ssh/config

echo "Copy to JOB ~/.ssh/authorized_keys:"
cat id_rsa.pub # Copy this out
Important
It is important that the newly generated key is copied into the first line of ~/.ssh/authorized_keys (the public key of your laptop should then be at the second line).
Common use cases for development
VSCode remote extension
You can connect your local Visual Studio Code window to the container and run code remotely.
To do this, you need to set up your ~/.ssh/config as described above.
Next, open a new Visual Studio Code window, click on Extensions in the left pane, search for the extension named Remote - SSH by Microsoft and install it. You may need to restart Visual Studio Code afterwards.
Then, you can connect your window by pressing CTRL+SHIFT+p (CMD+SHIFT+p on Mac) and searching for Remote-SSH: Connect Current Window to Host.... There, you select slurmjob (or any other name you have chosen in your ~/.ssh/config file). After the connection is established, you can open files, edit projects etc. as if they were on your local machine.
Jupyter notebooks
Insight a tmux session in your Slurm job, type in:
jupyter notebook <password>This way you set a password <password> for later.
Then, start Jupyter like this:
jupyter notebook --ip="*"When running this command, take note of the port Jupyter reports on the command line. As an example output:
[I 13:04:26.192 NotebookApp] Jupyter Notebook 6.4.10 is running at:
[I 13:04:26.192 NotebookApp] http://hostname:8888/
Then, from your local machine, you can forward this port by running the following command in a new terminal window:
ssh -L 8080:localhost:8888 slurmjobThis will forward the port 8888 from the container to your local machine's port 8080. If you close this terminal, this forwarding will stop.
You can, for example, forward the port to your local port 8080.
Then, you can access the notebooks on your local machine by visiting localhost:8080 in your web browser.
Type in your password <password> you set previously and you are good to go.
Instead of manually forwarding the ports, you can add the following to your ~/.ssh/config file to make this persistent:
Host slurmjob
	HostName ml2ran10s0
	ProxyJump gwkilab
	Port 26000
        LocalForward 8080 localhost:8888
Then, you just need to call ssh cluster in a terminal and you can connect to Jupyter in your browser as before.
Default Container
We provide multiple default container with essential development tools preinstalled and ready to use for interactive development sessions. The images are based on Nvidias NGC Container and are therefore optimized for the Nvidia architecture.
The use-case of this images is for interactive development not for batch processing.
Interactive PyTorch
This container has PyTorch preinstalled, but it is not directly accessible by your venv by default. To solve this after 22.05 you must execute:
/bin/python -m venv --system-site-packages .venv/sw
in the beginning to initialize your venv with the preinstalled pytorch package. It can be manually found under /opt/pytorch
Name |
PyTorch Version | Ubuntu Version | Disclaimer |
|---|---|---|---|
22.05-py3 |
1.12.0a0+8a1a93a | 20.04 | Uses Conda |
22.12-py3 |
1.14.0a0+410ce96 | 20.04 | Requires to use /bin/python |
23.01-py3 |
1.14.0a0+44dac51 | 20.04 | Requires to use /bin/python |
23.07-py3 |
2.1.0a0+b5021ba | 22.04 | Requires to use /bin/python |
23.09-py3 |
2.1.0a0+32f93b1 | 22.04 | Requires to use /bin/python |
23.12-py3 |
2.2.0a0+81ea7a4 | 22.04 | Requires to use /bin/python |
https://docs.nvidia.com/deeplearning/frameworks/pytorch-release-notes/
Interactive Tensorflow
Ubuntu
Cuda
Advanced topics
This section describes topics that go slightly beyond the basic usage of the cluster. It assumes that you are familiar with all basic topics.
Installing system packages
System packages are typically installed through apt install <package name>, which requires root privileges. If you have started your job the recommended way, these privileges are unavailable for security reasons.
Just do
apt-get -o Dpkg::Options::="--force-not-root" installto trick apt-get to install anyways.
Legacy-Solution: Click to expand if you need root in scenarios other than apt-get. Note that you can do a lot of stuff without being root, e.g. messing with files in /etc/
To install a system package nevertheless, we need to start a separate root-privileged session.
- Stop your current job: attach to your screen / tmux session and terminate the running
sruncommand by pressing CTRL+C. Caution: This will terminate all SSH sessions and all computations in your job. You can, however, return to this job later; all of its configuration (like installed Python packages) is persisted. - Start a spin-off of your job with root privileges:
# inside a screen / tmux session

srun -c 1 --container-remap-root --container-name=<my container name> --pty /bin/bash- Inside the newly opened terminal, you can freely install system packages. You can also take out any other configuration that requires root privileges.
# inside your job

apt install <package name>- Stop the root-privileged session by pressing CTRL+D.
- Restart your actual job without root privileges.
Custom Docker images
How to create your own images
Overview
In order to deploy your own Docker images via slurm you have to follow these steps:
- Build an image on your local machine¹ and push it into the
nvcr.ioregistry² - Log into
gwkilaband start the freshly build image viasrunorsbatch³ - Start whatever you wanted to start
¹ You can build Docker images from any machine that contains your nvcr API token (see below), except gwkilab, gwkilab1, gwkilab2 due to their Docker registry configuration. We recommend that you use your local machine.
² Nvidia ships their own Docker version with DGX clusters that is geared towards GPU usage, but comes with its own image registry. At this moment there does not seem to be a way to host our own registry (?)
³ Make sure that you tmux or screen beforehand to make jobs persistent as discussed below.
flowchart LR
PC --->|push| nvcr.io/mlr2
PC --->|ssh| gwkilab --->|srun| ml2ran01 --->|docker| Container
nvcr.io/mlr2 --->|auto pull| gwkilab
gwkilab --->|srun| ml2ran02 --->|docker| Container
gwkilab --->|srun| ... --->|docker| Container
1) Getting an nvcr API token
- Go to https://catalog.ngc.nvidia.com/ and login (top right corner). Make sure you are part of approrpiate lamarr team, e.g.
Lamarr/lamarr-dortmundteam. - Note All images are stored under the URLnvcr.io/ml2r/$TEAM/$IMAGE_NAMEwhich is different from the default URLnvcr.io/ml2r/$IMAGE_NAMEwhich does not contain the$TEAMname. - Click on your account name in the top right corner and go to
Setupand then click onGet API Key. - In the top right corner you find
Generate API keyto generate a new API key.- Note Carefully store this API key. The webpage does not store it for you. There is no way to view this API key afterwards!
2) Building and pushing the docker image from your local machine
- Make sure that docker is correctly setup on your local machine.
- Add the nvcr API token to your local docker setup
user@PC:~$ sudo docker login nvcr.io
Username: $oauthtoken
Password: YOUR_API_KEY
Note: $oauthtoken is a special user name that indicates that you will authenticate with an API key and not a username and password.
Note: Oftentimes the password prompt shows empty characters (e.g. in bash), but you can still copy/paste the API key. If you are in doubt if your API was stored correctly, you can check ~/.docker/config.json or /root/.docker/config.json(depending on your system setup) which should contain the correct API key.
- Build your docker image with the name
$IMAGE_NAMEand the team$TEAM, tag it correctly, and push it to nvcr:
user@PC:~$ sudo docker build -f Dockerfile --network=host -t $IMAGE_NAME .
user@PC:~$ sudo docker tag my_nice_container nvcr.io/ml2r/$TEAM/$IMAGE_NAME
user@PC:~$ sudo docker push nvcr.io/ml2r/$TEAM/$IMAGE_NAME
Note
The build process of all available Docker images is published in the custom-container-example repository. We recommend using this build process as your starting point.
Note
We understand that the path nvcr.io/ml2r/$TEAM/ looks somewhat weird as it contains ml2r and lamarr, but this cannot be changed at the moment due to historic reasons and due to the account management of Nvidia.
3) Starting your container as usual.
You should be able to start your container as usual via srun / sbatch. However, make sure that you adapt the path correctly to contain your team's name, i.e.
user@gwkilab:~$ srun --mem=96GB --export ALL -c 16 --container-name=my_nice_container -p GPU1 --gres=gpu:1 --container-image=nvcr.io/ml2r/$TEAM/$CONTAINERNAME --pty /bin/bash.shNote: The first loading and creation of a container including the file system can take some time, more than 10 minutes for a very large container.
Advanced storage topics
The storage is divided between two distinct units very fast local storage (/raid) and slower remotely mounted storage (cephfs).
Both systems have distinct advantages and disadvantages
| \ | Raid | CephFS |
|---|---|---|
| Speed | Fast | Slow |
| Latency | Low | High |
| Reliability | Data can be deleted after a Job ends, or the node stops | Redundant storage divided between multiple nodes |
| Accessibility | Shared between Jobs on a single node | Shared between all Jobs in the cluster environment and Gateways |
| Size | Ranging from 14 to 28TB depending on node | Several hundred TB |
| Use case | Temporary data, checkpoints, intermediate results, training data | Final results |
Expert topics
Using the Cluster SQL Database for Logging
We provide a MySQL database for centralized experiment logging and tracking. The database is available at: mysql01.lamarr.tu-dortmund.de from the internal cluster network. It cannot be reached from the outside. To get access, contact Dominik - he will then create an account. Once your account has been created, your credentials will be stored in:
~/.sql/loginThis file will contain the following fields:
DATABASE=<your_database_name>
USER=<your_username>
PASSWORD=<your_password>
Changing Your Password
If you wish to change your password, you can do so using the MySQL client. Make sure mysql-client is available. For example, on Ubuntu, you can install it via:
apt-get update && apt-get install -y mysql-clientthen log into the database via
mysql -h mysql01.lamarr.tu-dortmund.de -u <USER> -pand change your password by executing
ALTER USER '<USER>'@'%' IDENTIFIED BY '<NEW_PASSWORD>';Replace <USER> and <NEW_PASSWORD> accordingly.
Tip: Always read credentials dynamically from ~/.sql/login instead of hardcoding them in your code to avoid accidental exposure (e.g., in Git repositories). So make sure this file is up-to-date.
Example Usage with MLflow
You can connect MLflow to the shared SQL database as follows:
import os
import mlflow

# Load credentials from ~/.sql/login
creds = {}
with open(os.path.expanduser("~/.sql/login")) as f:
    for line in f:
        key, value = line.strip().split("=", 1)
        creds[key] = value

# Construct the tracking URI
tracking_uri = (
    f"mysql+pymysql://{creds['USER']}:{creds['PASSWORD']}@<URL>/{creds['DATABASE']}"
)

# Configure MLflow
mlflow.set_tracking_uri(tracking_uri)
mlflow.set_registry_uri(tracking_uri)  # optional, for model registry
mlflow.set_experiment("my_experiment")

# Set artifact storage (local folder)
artifact_uri = os.path.expanduser("~/mlflow")
os.makedirs(artifact_uri, exist_ok=True)

# Start a run
with mlflow.start_run():
    mlflow.log_param("some_important_param", 0.001)
    mlflow.log_metric("some_important_metric", 0.95)

print("Logging completed successfully.")
Slum
Some slurm commands and options can be usefull but a not generaly used in everyday work:
Exclude / Force Nodes
With the options -w (AllowList) -x (BlockList) the job can be sheduled on specific nodes or excluded from others. The Blocklist can be used when a specific job does not start on a node because of hardware failure or a system error and the node is not automatically removed from the queue. If you experience such errors please notify the admin team regardless.
Mass Processing
To process several files or configurations at once a combination of environment variables and scripts can be used to steer the job. In non container usecases it is recommended to use sbatch for this kind of workload, sadly at the moment this does not work well with the container environment, therefore srun will be used.
The first step for creating a job is creating a directory in your cephfs system where your scripts will be stored and data will be logged. For this execute the following commands on gwkilab:
mkdir -p /cephfs/users/${USER}/scripts
mkdir -p /cephfs/users/${USER}/logs
ln -s /cephfs/users/${USER}/scripts ~/
ln -s /cephfs/users/${USER}/logs ~/
Now the execution and submit scripts can be created:
cat ~/scripts/run.sh

#!/bin/bash

#SBATCH --time=02-00:00:00
#SBATCH --partition=CPU
#SBATCH --nodes=1
#SBTACH --ntasks-per-node=1
#SBATCH --mem-per-cpu=32000mb
#SBATCH --mail-type=FAIL,TIME_LIMIT_90,TIME_LIMIT
#SBATCH --mail-user=XXX
#SBATCH -e ~/logs/sbatch_example-%j.err
#SBATCH -o ~/logs/sbatch_example-%j.out


echo "Job Started"
hostname
echo $SLURM_JOB_ID
echo $TEST1
echo $TEST2
cat ~/scripts/submit.sh
for itr in 1 2 3 4 5
do
srun --job-name=test_job_${itr} --export='TEST1=1,TEST2=${itr}' --container-name=test_sbatch --container-workdir=$HOME ./run.sh &You need to add your data into booth scripts to adjust it to your workload.
Hardware
The cluster has a large number of different hardware installed. This includes the computers, the storage infrastructure, the gateways, IB and Eth switches and services machines. The following sections should give an overview for the essential components:
Computing Nodes - DGX A100
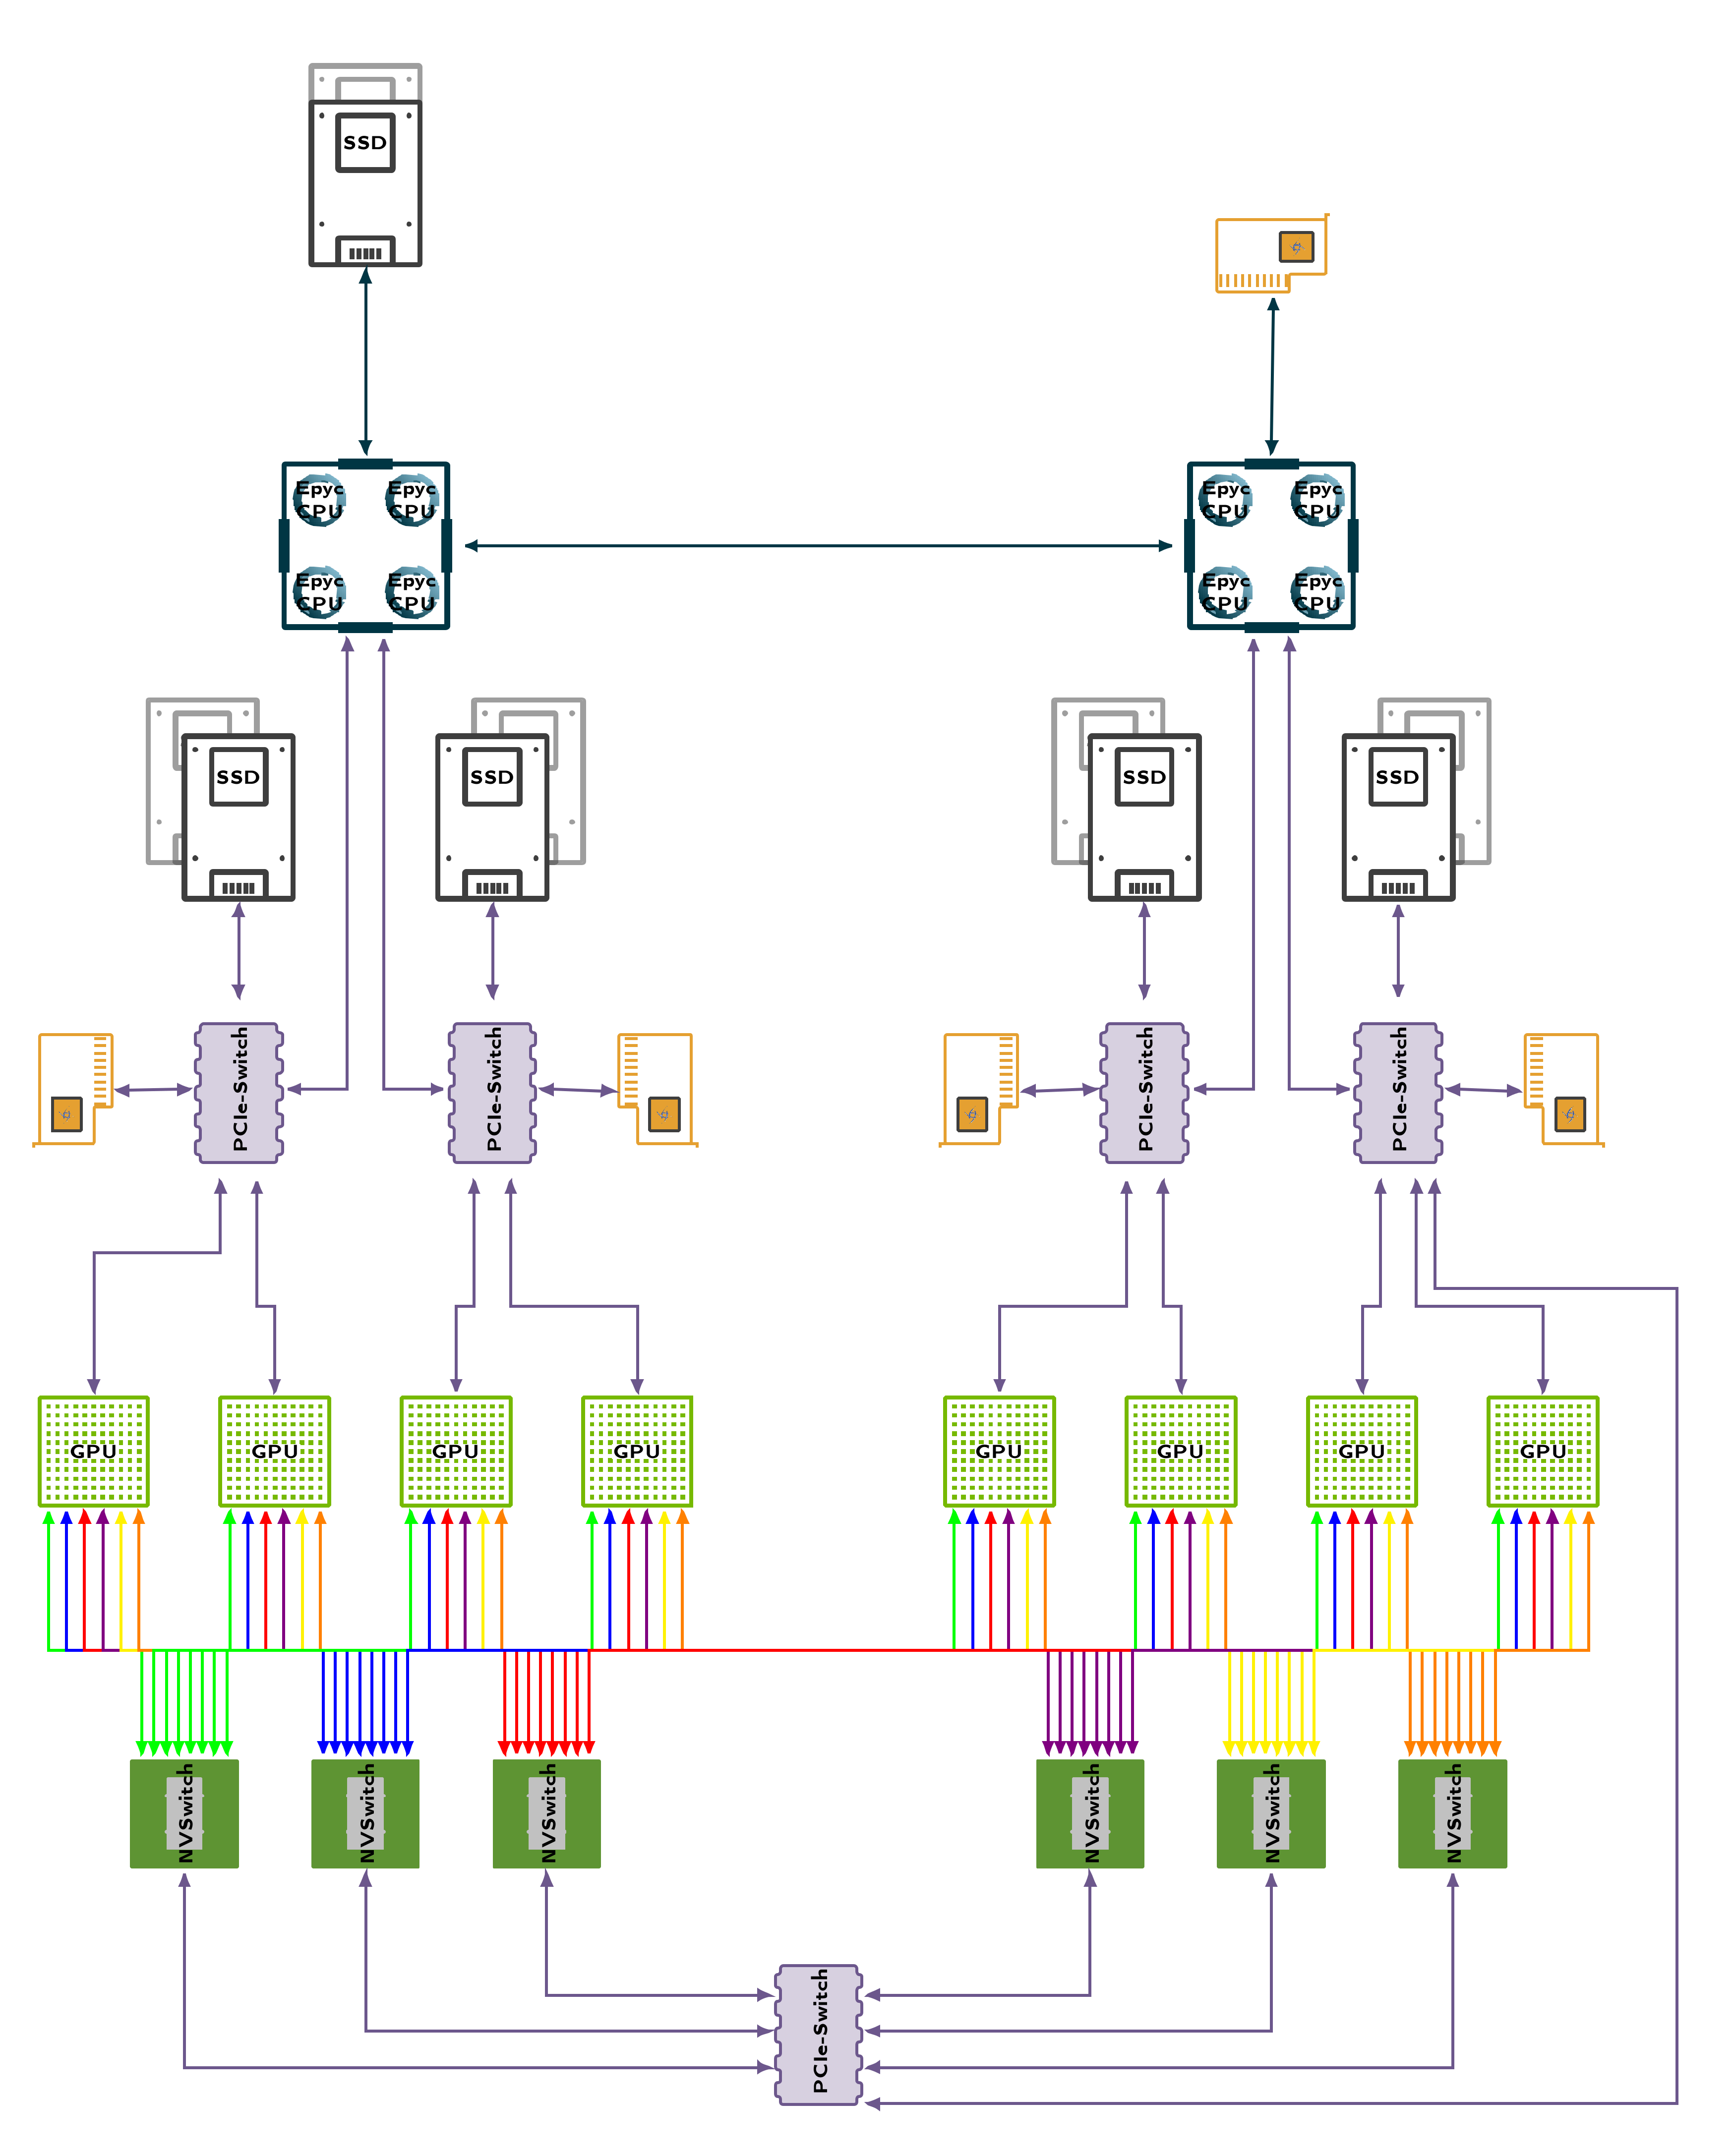
The cluster utilizes two versions of the DGX A100 node. Nodes 1-8 use the 40GB GPU variant, Nodes 9-12 the 80GB variant. RAM and local discs are scaled accordingly.
Hardware affinity
For the highest performance of every container, it is necessary to pay attention to the internal architecture of the node. Each CPU Socket has a fixed number of memory and PCI controller linked to individual Cores. To communicate with hardware not interfaced from those Cores several synchronization barriers must be passed which significantly slows down communication. In worst case, data must be transferred via CPU-CPU link. The primary bottlenecks for the PCI Bus is the transfer of your training data from host to the GPU device memory. Most of this is taken care of by SLUM, but when executing multiple programs parallel in the same job you effectively bypass this configuration and will need to do this yourself.
CPU device affinity
nvidia-smi topo -mp
| GPU | CPU | NUMA |
|---|---|---|
| GPU0 | 48-63,176-191 | 3 |
| GPU1 | 48-63,176-191 | 3 |
| GPU2 | 16-31,144-159 | 1 |
| GPU3 | 16-31,144-159 | 1 |
| GPU4 | 112-127,240-255 | 7 |
| GPU5 | 112-127,240-255 | 7 |
| GPU6 | 80-95,208-223 | 5 |
| GPU7 | 80-95,208-223 | 5 |
Network device affinity
nvidia-smi topo -m
| GPU | Network Card |
|---|---|
| GPU0 | mlx5_0, mlx5_1 |
| GPU1 | mlx5_0, mlx5_1 |
| GPU2 | mlx5_2, mlx5_3 |
| GPU3 | mlx5_2, mlx5_3 |
| GPU4 | mlx5_4, mlx5_5 |
| GPU5 | mlx5_4, mlx5_5 |
| GPU6 | mlx5_6, mlx5_7 |
| GPU7 | mlx5_6, mlx5_7 |
Storage device affinity
https://docs.nvidia.com/gpudirect-storage/configuration-guide/index.html
Storage (expert)
| Hardware | Description |
|---|---|
| CPU | 2x EPYC Rome 7302 |
| RAM | 16x 32GB 3200MHz ECC |
| SSD (OS) | 2x 1.92TB |
| SSD (Storage) | 9x 15.36TB Micron 9300 Pro |
| Network | 1x Dual 200GBe Ethernet |
Networking
The storage and nodes are connected via dual 200 GB-Ethernet network over two switches. The GPUs support collision free communication with a full spanning 200GBe Infiniband tree.
Enroot
Enroot in combination with pyxis represents the container interface of Slurm. It allows containers to be automatically downloaded and executed inside of jobs. Compared to Docker the interface is more light weight, but does not support the full level of abstraction docker does.